UIScrollView Tutorial: Getting Started
In this UIScrollView tutorial, you’ll create an app similar to the default iOS Photos app to learn all about paging, scrolling and more with UIScrollView. By Ron Kliffer.
UIScrollView is one of the most versatile and useful controls in iOS. It’s the basis for the very popular UITableView and it’s a great way to present content that’s larger than a single screen.
In this UIScrollView tutorial, you’ll create an app similar to the default iOS Photos app and learn all about UIScrollView. You’ll learn how to:
- Use
UIScrollViewto zoom and view a very large image. - Keep
UIScrollView‘s content centered while zooming. - Use
UIScrollViewfor vertical scrolling with Auto Layout. - Prevent the keyboard from hiding text input components.
- Use
UIPageViewControllerto allow scrolling through multiple pages of content.
This tutorial assumes you understand how to use Interface Builder to add objects and connect outlets between your code and storyboard scenes. If you’re not familiar with Interface Builder or storyboards, work through our storyboards tutorial before starting this one.
Getting Started
Use the Download Materials button at the top or bottom of this tutorial to download the starter project, then open it in Xcode. Build and run using an iPhone 8 simulator to see what you’re starting with. Continue using the iPhone 8 simulator for the rest of the tutorial.

You’ll see that you have several photos available in your project. You can select a photo to see it full-sized, but sadly, the device’s limited size prevents you from seeing the whole photo.
What you really want is to fit the image to the device’s screen by default and zoom to see details, just like the Photos app does.
Can you fix it? Yes, you can!
Scrolling and Zooming a Large Image
To kick off this UIScrollView tutorial, you’ll set up a scroll view that lets the user pan and zoom an image.
Open Main.storyboard and drag a Scroll view from the Object Library onto the document outline, right below View on the Zoomed Photo View Controller scene. Then, move Image View inside your newly-added Scroll View. Your document outline should now look like this:

See that red arrow? Xcode is complaining that your Auto Layout rules are wrong.
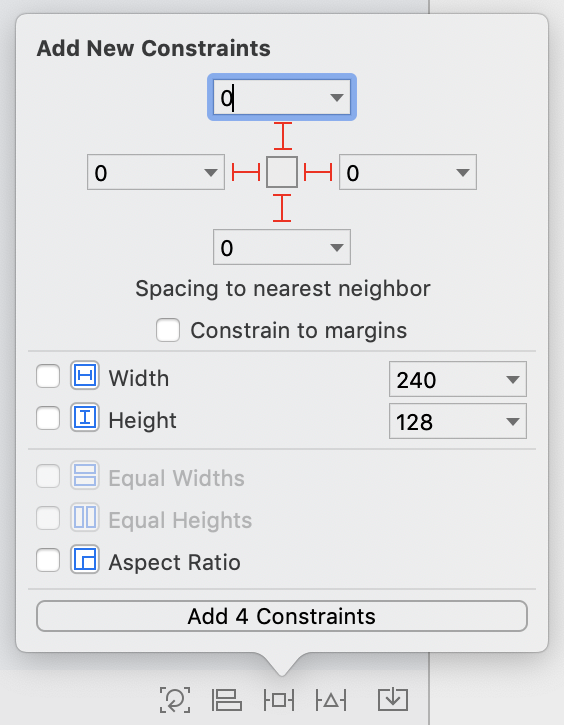
To fix them, select Scroll View and click the Pin button at the bottom of the storyboard window. Add four new constraints: top, bottom, leading and trailing. Set each constraint’s constant to 0 and uncheck Constrain to margins. The result should look like this:
Now, select Image View and add the same four constraints on it. Make sure to pin the constraints to the Scroll View and not the Frame Layout Guide, like this:

Build and run.

Thanks to the scroll view, you can now swipe to see the full-size image! But what if you want to zoom in and out? Or what if you want to see the picture scaled to fit the device’s screen?
You’ll need to write code for those cases!
Panning and Zooming Your Image
Open ZoomedPhotoViewController.swift and add the following outlets inside the class declaration:
@IBOutlet weak var scrollView: UIScrollView!
@IBOutlet weak var imageViewBottomConstraint: NSLayoutConstraint!
@IBOutlet weak var imageViewLeadingConstraint: NSLayoutConstraint!
@IBOutlet weak var imageViewTopConstraint: NSLayoutConstraint!
@IBOutlet weak var imageViewTrailingConstraint: NSLayoutConstraint!
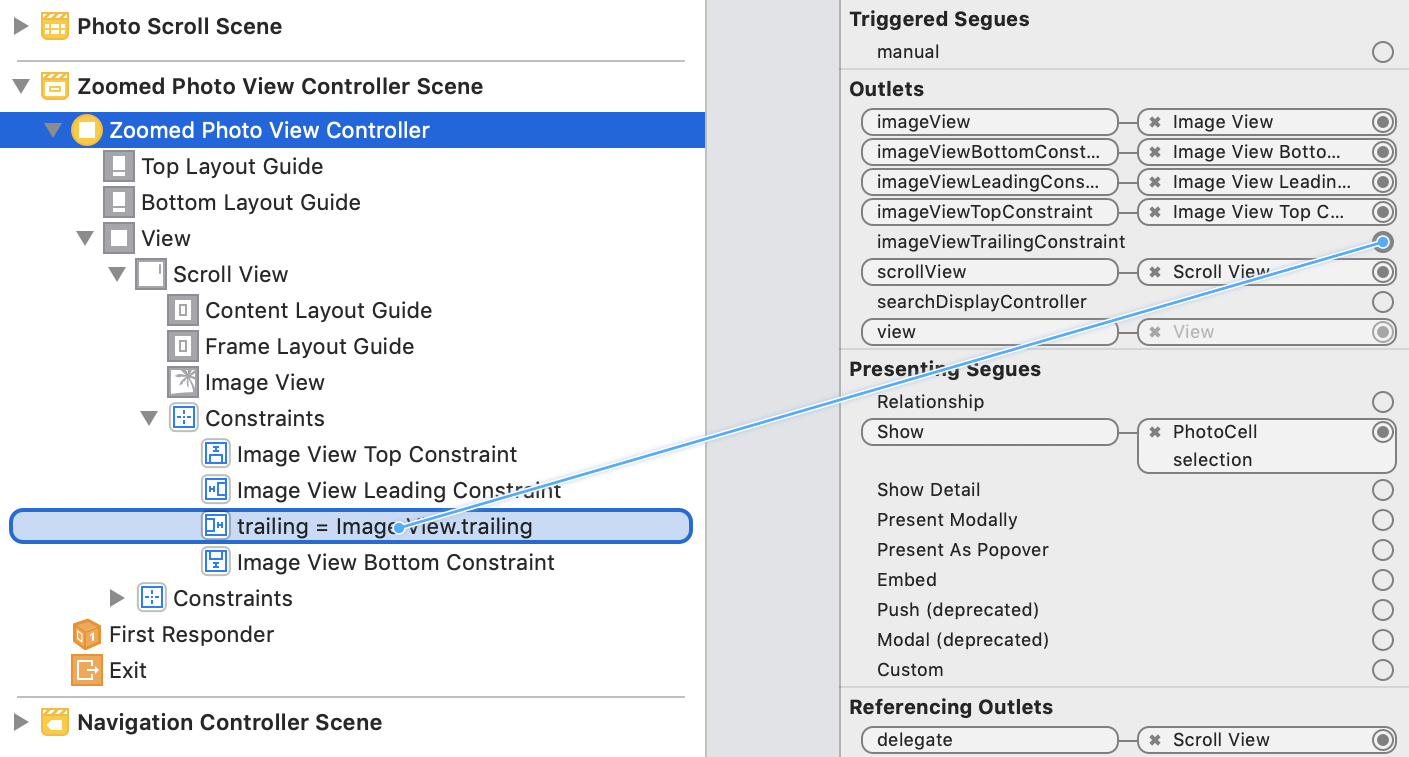
Back in Main.storyboard, set the scrollView outlet to Scroll View and set the Scroll View’s delegate to Zoomed Photo View Controller. Also, connect the new constraint outlets to the appropriate constraints in the document outline, like this:
Back in ZoomedPhotoViewController.swift, add the following to the end of the file:
extension ZoomedPhotoViewController: UIScrollViewDelegate {
  func viewForZooming(in scrollView: UIScrollView) -> UIView? {
    return imageView
  }
}
This makes ZoomedPhotoViewController conform to UIScrollViewDelegate and implements viewForZooming(in:). The scroll view calls this method to determine which of its subviews to scale when the user pinches the image. Here, you tell it to scale imageView.
Setting the Zoom Scale
Next, add the following inside the class, right after viewDidLoad():
func updateMinZoomScaleForSize(_ size: CGSize) {
  let widthScale = size.width / imageView.bounds.width
  let heightScale = size.height / imageView.bounds.height
  let minScale = min(widthScale, heightScale)

  scrollView.minimumZoomScale = minScale
  scrollView.zoomScale = minScale
}
This method calculates the zoom scale for the scroll view. A zoom scale of 1 indicates that the content displays at its normal size. A zoom scale of less than 1 shows a zoomed-out version of the content, and a zoom scale greater than 1 shows the content zoomed in.
To get the minimum zoom scale, you first calculate the required zoom to fit the image view snugly within the scroll view, based on its width. You then calculate the same for the height. You take the minimum of the width and height zoom scales, and set this value for both minimumZoomScale and zoomScale of scrollView.
You’ll initially see the entire image fully zoomed-out, and after zooming in, the user will be able to zoom out to this level, too.
Since the maximumZoomScale defaults to 1, you don’t need to set it. If you set it to greater than 1, the image may appear blurry when the user zooms in on it. If you set it to less than 1, you won’t be able to zoom in to the full image’s resolution.
Finally, you need to update the minimum zoom scale each time the controller updates its subviews. Add the following right before the previous method to do this:
override func viewWillLayoutSubviews() {
  super.viewWillLayoutSubviews()
  updateMinZoomScaleForSize(view.bounds.size)
}
Build and run; you should get the following result:

Now, when you tap on an image, it fits on the screen. You can pan around it and zoom in or out. Awesome!
However, there’s still one problem: The image is pinned to the top of the scroll view. It’d sure be nice to center it instead, right?
Centering Your Image
Still in ZoomedPhotoViewController.swift, add the following inside the class extension, right after viewForZooming(in:)
//1
func scrollViewDidZoom(_ scrollView: UIScrollView) {
  updateConstraintsForSize(view.bounds.size)
}

//2
func updateConstraintsForSize(_ size: CGSize) {
  //3
  let yOffset = max(0, (size.height - imageView.frame.height) / 2)
  imageViewTopConstraint.constant = yOffset
  imageViewBottomConstraint.constant = yOffset

  //4
  let xOffset = max(0, (size.width - imageView.frame.width) / 2)
  imageViewLeadingConstraint.constant = xOffset
  imageViewTrailingConstraint.constant = xOffset

  view.layoutIfNeeded()
}
Now, go over this step-by-step:
- The scroll view calls
scrollViewDidZoom(_:)each time the user zooms. In response, you simply callupdateConstraintsForSize(_:)and pass in the view’s bounds size. -
updateConstraintsForSize(_:)gets around an annoyance withUIScrollView: If the scroll view’s content size is smaller than its bounds, it places the contents at the top-left of the screen, rather than the center. - You center the image vertically by subtracting the height of
imageViewfrom theview‘s height and dividing the result in half. This value adds padding to the top and bottomimageViewconstraints. - Similarly, you calculate an offset for the leading and trailing constraints of
imageView, based on the width of the view.
Pat yourself on the back, then build and run your project! Select an image and you’ll end up with a lovely, centered image that you can zoom and pan. :]
